Tuesday, August 25, 2020

How To Replace A Range Oven Door Lock Assembly

One of the most common problems you’re likely to encounter with your oven is the door lock malfunctioning. Sometimes the oven door won’t unlock if there’s a problem with the oven door lock mechanism. There are several reasons why you are going to have the problem with the oven door lock not working as it should under normal circumstances. You may begin to have the problem with the oven door not unlocking after using the self-cleaning feature. During self-cleaning, the oven door won’t unlock for safety reasons until the oven has cooled down to the normal room temperature. But if you happen to lose power or disconnect the appliance from power while the self-cleaning process is underway, the lock motor won’t complete the cycle to unlock the door.

Troubleshooting to fix oven door won’t unlock problem

In order to effectively fix the problem with your oven door not unlocking, you may have to reset the lock motor or test to make sure it’s not broken.

Reset the door lock motor

Pull your range off the wall and make sure to disconnect it from the power. You will have to remove the back panel in order to access the lock motor assembly. Remove the screws holding the lock motor assembly in place. Pull the lock motor assembly down in a forward tilted position in order to release the door latching rod and unhook the locking end of the rod from the drive cam. Then you can push the rod forward and easily open the oven door. Make note of the drive cam position and the hole into which the locking rod fits into. Unscrew and remove the drive cam before rotating it 180 degrees from the position where it was when locked and put it back into its place where it locks into the motor shaft. The switch arm should be aligned properly on the side edge of the drive cam before you install back the screw. The Locking rod should be hooked back into the drive cam before you can secure the motor bracket assembly back onto the range with screws. After this, you should be able to cook with your range oven once again.

Test for broken door lock motor

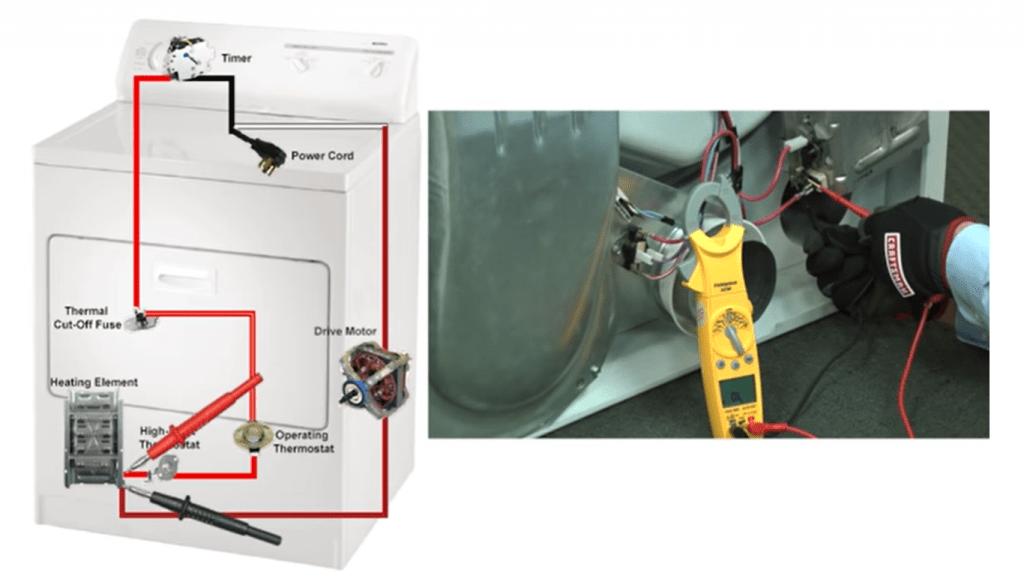
If your oven has a bad door lock, you are likely to get the door stuck again anytime you run the self-cleaning cycle. You need to test the lock motor circuit using a multimeter to test for electrical continuity. The back panel should still be off to allow you to do this while you must always make sure the appliance is disconnected from power while checking for continuity. Locate the two electrical wires going into the lock motor and disconnect them. You will then need to measure ohms for resistance across the terminals of the lock motor. If there’s no continuity, you will have to replace the bad motor. But if there is continuity, you may want to check the wire harness for a possible break.

Check for a break in the wire harness

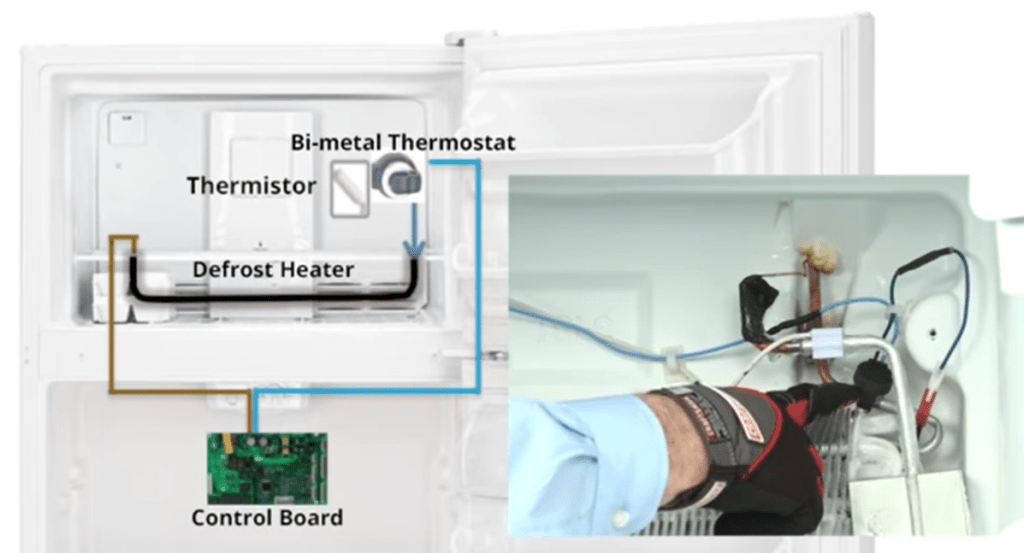
Connect back the wires on the lock motor and remove the upper back panel where the electronic control board is located. Identify two wires from the motor going into the electronic control board. Disconnect these wires from the electronic control board terminals and check for continuity across the wires using the multimeter. If you don’t detect any continuity, then you have to repair the broken wire harness. If there’s continuity, then both the wire harness and the lock motor are good so it could be that the electronic control board is not sending current to the lock motor. The electronic control board should be replaced in that case.

Oven door lock replacement

To replace the oven door lock assembly, make sure the appliance is disconnected from power then remove the back panel. Remove the screws holding the door lock assembly in place to set it free from the locking rod. Put a new door lock assembly in the same place where you have removed the old one and install the screws back. Now you can just disconnect the wires from the old door lock assembly into the new one. After that, you can put everything back together and connect the oven back to the power ready for use.

Here Are Some Of The Most Popular Areas We Service:

Weston, Sunrise, Pompano Beach, Pembroke Pines, Parkland, Oakland Park, North Lauderdale, Margate, Lighthouse Point, Fort Lauderdale, Davie, Coral Springs, Plantation, Tamarac, Deerfield Beach, Miramar, Hallandale, Lauderhill, Hollywood, Orlando, Cooper City, Coconut Creek, Lauderdale Lakes, Dania

The post How To Replace A Range Oven Door Lock Assembly first appeared on Appliance Repair Fort Lauderdale.


How To Replace A Range Oven Door Lock Assembly syndicated from Appliance Repair Fort Lauderdale

Thursday, July 16, 2020

How To Repair If Your Washer Won’t Start

What to check and fix for a washing machine not starting up

When your washing machine isn’t starting or turning on, there are many possible causes including faulty parts and components that may need to be replaced.

Lid Switch Replacement

For top load washing machines, the lid switch detects if the washer lid is closed for safety purposes. Depending on the model of the washing machine, with the lid open the washer will not start. With a defective lid switch the washer doesn’t start even if the washer lid is closed. Before the basket starts spinning the lid must be closed, while for other top load washer models the washer drive motor doesn’t run until the lid is closed. The washer will also not fill if the lid is open. The lid switch must be replaced if it isn’t detecting whether the lid is closed.

Washer Door Lock Assembly Replacement

For front load washers, the door lock assembly is the safety switch that is supposed to detect when the washing machine door is closed. It includes a latch plus a locking mechanism. Failure of any of the components when the door is open means that the door won’t lock and similarly if the failure occurs with the door closed it doesn’t open. The solution if any of the components fails is to replace the entire door lock assembly.

Main Control Board Replacement

The main electronic control board which is also known as the motherboard acts like the “brains” of the washing machine and is responsible for governing the timing and the execution of the washing machine’s component functions. It starts and stops different components of the washer. It is responsible for controlling the washer fill valves, the washer drive motor and the washer drain pump. When the display on the control board of a front-load washer isn’t lighting up, or the washing machine isn’t starting, filling, spinning or draining, the problem could be with the electronic control board. But that’s not easy to diagnose, so it is strongly recommended to have an appliance repair expert to check your washer.

The Motor Control Board Replacement

When your front load washer is not starting, the problem could be with its motor control board. The motor control board problem can make the washer not to spin and even if it does may be spinning at the wrong speed. The motor control board is basically a circuit control board located at the bottom side of the front load washer which is close to the drive motor. It is for monitoring and controlling the drive motor speed and direction responsible for the tumbling and spinning actions associated with the cycle.

Timer Replacement

The timer is also known as the cycle selector and it controls the washer component functions. When a top load washer isn’t advancing through the cycles or is getting stuck in one cycle, most likely the timer is failing. The timer uses a motor for advancing internal cams inside its body. A user selects cycles through a knob linked to the stem of the timer.  When the motor fails to advance or the contacts in the timer become defective, you have to replace the timer.

User Interface Board Replacement

When one or more buttons on the user interface board are not working, your washer machine may not be able to start. The user interface board allows you to set up the cycle and you have to replace it if the buttons are not working.

Inlet Valve Assembly Replacement

A bad water inlet valve assembly can make a direct drive top load washer not to start. The electrically operated water valves are used for controlling the filling function of the washing machine. If the washer won’t fill, the wash cycle won’t start. You have to replace the water inlet valve assembly if the washing machine isn’t filling because of a valve that isn’t opening or is the washer is overfilling as a result of a valve that is not closing.

Water Level Pressure Switch Replacement

A faulty water level pressure switch also prevents a direct drive top load washer from starting because the switch won’t detect if the water fills the wash tub. The washer doesn’t fill or can overfill and even overflow if the water level pressure switch isn’t controlling the water level in the washer. In that case the switch would need replacement.

These Are Among The Areas We Service In Broward County:

Sunrise, Plantation, Parkland, North Lauderdale, Miramar, Lauderhill, Weston, Oakland Park, Pembroke Pines, Tamarac, Pompano Beach, Margate, Hollywood, Lighthouse Point, Lauderdale Lakes, Fort Lauderdale, Davie, Coral Springs, Coconut Creek, Hallandale, Deerfield Beach, Dania, Cooper City


How To Repair If Your Washer Won’t Start syndicated from Appliance Repair Fort Lauderdale

Wednesday, June 10, 2020

How To Troubleshoot And Fix A Dishwasher Not Draining

If your dishwasher isn’t draining, it could be as a result of clogging that can occur in several places within and around the dishwasher parts and connections that need careful inspection to identify them for unclogging. It can also be due to defective parts or electrical components of the dishwasher.

Dishwasher won’t drain – steps for troubleshooting and fixing the problem

Here are the different areas you need to check when troubleshooting your dishwasher to find out exactly what causes it not to drain properly.

Check for clog in the sink drain and garbage disposal

A clogged sink drain is a common problem that prevents a dishwasher from draining. So if after running water through your sink it doesn’t drain, make sure to clear it and that will fix the problem to allow your dishwasher to drain. If you have a garbage disposal for the sink, you can also run to see if water drains properly. If it doesn’t drain, clear it out. A broken garbage disposal that’s not draining needs to be replaced because if not it keeps clogging again and again. Also if you installed a garbage disposal but forgot to remove the knockout plug, it will prevent water from leaking through the opening of the dishwasher drain. That is an important step when installing a garbage disposal.

Check for possible grease clogs

The dishwasher drain hose connecting between the sink and the garbage disposal can also attract grease clogs and that too will cause the dishwasher not to drain. Remove the drain hose from the sink or garbage disposal connections to check for grease clogs. If any of it is found it should be cleared before reinstalling the drain hose. To test if the problem is fixed, you have to run the drain pump, which on most models is done by pressing the cancel button immediately after starting the cycle. For a dishwasher with a timer, you can jump to the drain portion of the cycle. All you need to do is to turn the timer to the end of the cycle.

Check for air gap blockages

Some dishwashers use an air gap which you should see next to the faucet of your sink. The air gap can get clogged too and the signs include stained water or water trails coming out of the vent holes. If you notice any of the signs, remove the air gap cap and also the cover. Run the plumbers snake through the drain hose running from the air gap to the sink drain or the garbage disposal to get the clog cleared. Other ways to clear it is by blowing air through it or using a wet/dry vacuum to suck all the debris out.

Check the pump drain hose

Clogs can also occur anywhere within the drain hose from the sink drain to the drain pump. Before doing the checks you will have to make sure the dishwasher is disconnected from the electrical power source. Any water in the dishwasher tub should also be removed either by bailing it out or sucking it out with a wet/dry vacuum. In order to access the drain hose connection on the pump drain, you have to remove the front panels of the dishwasher. Once you access the drain pump place underneath it a towel or a shallow pan to collect any water from the dishwasher sump. When checking for any clogs within the drain hose running between the sink drain and the drain pump, place the drain pump end of the drain hose on a shallow pan and pour some water from sink drain end of the drain hose. If there is an air gap also pour water from that end. If the water doesn’t go through then you will know there is a clog somewhere in the drain hose. So you will have to pull out the dishwasher completely and run the plumbers snake through the drain hose to clear the clog.

Problems that call for a professional appliance service technician

If you complete all the checks described above and still your dishwasher won’t drain, then probably you have more technical issues like a clog in the drain pump, the sump, a defective drain pump, defective timer or control board. Call a qualified appliance technician to fix it.

Here are some of the most popular cities that we service in Broward County

Sunrise , Tamarac , Pembroke Pines , Plantation , Hollywood , Oakland Park , Weston , North Lauderdale , Deerfield Beach , Margate , Fort Lauderdale , Miramar , Parkland , Lighthouse Point , Dania , Hallandale , Coral Springs , Lauderdale Lakes , Cooper City , Lauderhill , Davie , Coconut Creek, Pompano Beach


How To Troubleshoot And Fix A Dishwasher Not Draining syndicated from Appliance Repair Fort Lauderdale

Monday, May 11, 2020

How To Troubleshoot When Electric Dryer Won’t Heat

One of the most common problems that homeowners face with their electric dryers is when they have a dryer not heating up. There are several possible reasons associated with failure of different components that can make the dryer to stop heating. In order to troubleshoot effectively when an electric dryer is not heating, all the different components will need to be tested.

Any of the following components can be the cause of the problem and should be included in the troubleshooting procedure:

  • Power cord
  • Heating element
  • High-limit thermostat
  • Operating thermostat
  • Thermal cut-off fuse
  • Timer

Check the power cord

One of the most common reasons why a dryer will not be heating is if it doesn’t get the correct amount of power. It’s easy to forget and assume nothing is wrong with the power, but that’s an important check at the beginning of your electric dryer troubleshooting process. The heating element requires 240 volts while the motor will start running even with as low as 120 volts. Do a check of the power cord to make sure it has no damage and reset the circuit breaker in your house to confirm it hasn’t tripped. You can then turn the knob to put the dryer on a timed dry for high heat cycle to see if it will heat up. If that doesn’t solve the problem, next you will need to check the components on the control circuit for continuity.

Checking for continuity

You will need a multimeter to test all the control circuit components at once. Make sure to disconnect your dryer from the power source for safety while checking for continuity. You will also need to remove the dryer’s back panel and also the back of its control panel. Check on the timer’s terminal “A” to unplug a large red wire.  Then take your multimeter and set it to read ohms for measuring resistance. You will then need to measure the resistance between the large red wire unplugged from the “A” terminal on the timer and the terminal on the heating element where the large red wire connects. Your multimeter should read about 15 ohms of resistance if there is continuity for the heating element, high-limit thermostat, operating thermostat and thermal cut-off fuse.

Checking the heating element

If you detect no continuity for the control circuit, you will next need to check for the continuity of each component one at a time. Start by placing your multimeter leads on the terminals of the heating element. If there is continuity, your multimeter should also read about 15 ohms. That would indicate no problem with the heating element, so next you will need to do the same test for the high-limit thermostat.

Check the high-limit thermostat

Place your multimeter leads one for each of the terminals of the high-limit thermostat and you should read near zero ohms if there is continuity. In case there is no continuity, then it would mean that the high-limit thermostat is bad and would require replacement. If no problem, next check the operating thermostat.

Check the operating thermostat

Place one lead of the multimeter on one of the wire terminals and the other lead on the remaining wire terminal. You should also measure near zero ohms if there is continuity, but if no continuity then the operating thermostat would need to be replaced. If that goes well, next check continuity for the thermal cut off fuse

Check thermal cut-off fuse

With this you should also read near 0 ohms if it’s good and there is continuity, if not then replace the fuse. If everything is good so far, the last thing to check will be the timer.

Checking the timer

Make sure your dryer is still disconnected and turn the timer to time dry, dry heat. Placing one lead of the multimeter on terminal “A” with red wire and the other lead on terminal “C” with black wire, you can check for continuity of the timer. If no continuity you have to replace the bad timer. But if everything is still good so far, the dryer could be failing to heat for other reasons like faulty motor centrifugal switch, plug or circuit breaker. To fix that you might need to call a professional appliance repair service near you.

We Service These Popular Cities In Broward County:

Tamarac , Pompano Beach , Pembroke Pines , Parkland , North Lauderdale , Miramar , Lauderhill , Hollywood , Fort Lauderdale , Davie , Dania , Cooper City , Weston , Lighthouse Point , Plantation , Oakland Park , Margate , Lauderdale Lakes , Coconut Creek, Deerfield Beach , Coral Springs , Hallandale , Sunrise


How To Troubleshoot When Electric Dryer Won’t Heat syndicated from Appliance Repair Fort Lauderdale

Tuesday, April 7, 2020

Troubleshoot & Fix Defrost System Problems In Refrigerators

Sometimes when your refrigerator is not cooling, it could be as a result of frost build-up on the wall at the back inside the freezer. It is important to understand how you can go about troubleshooting and fixing the problem. To do that you will need to understand the various components of the defrost system that are responsible for making it function properly. These include the electronic control board, the defrost heater, the thermistor, and the bi-metal thermostat. You need to understand how each one of these components works in order to be able to determine whenever one of them is responsible for the problem within the defrost system that makes the refrigerator not to cool.

For some of the tests you need to do to troubleshoot the defrost system, you need to use a multimeter. The refrigerator is not supposed to have any frost build up as long as the defrost system is automatically defrosting the evaporator after every 8 hours. But when there is a problem with the defrost system, frost builds up and will cause the clogging of the passages that allow cool air from the freezer into the refrigerator for cooling. With the clogged passages the refrigerator warms up, so we need to find out the exact cause of the problem in the defrost system.

The main components of the defrost system and possible problems

There are four main parts of the defrost system. The electronic control board is the one that starts the defrost cycle and determines how often they should be triggered. A thermistor, also known as the defrost temperature sensor, is responsible for sensing the temperature on the evaporator and sends a signal to the control board to start a defrost cycle. The electronic control board does that by turning on the defrost heater, which is responsible for the melting of any frost on the evaporator fins. If the thermistor senses the wrong temperature on the evaporator, then it doesn’t send a signal to the control board to start the defrost cycle. In that case, the control board doesn’t turn on the defrost heater and the frost on the evaporator stays put. The heater itself can also break or a defective bi-metal thermostat could fail to turn it on, which means we still end up with frost buildup on the evaporator. A broken heater or a faulty bi-metal thermostat requires replacement.

Checks for defrost heater problems

To test the defrost heater, first switch into a forced defrost mode. You can refer to the technical sheet of your appliance to know how to do this. You can find it taped at the back of the appliance or behind the bottom front grill. To exit the forced defrost mode, you can just unplug the appliance. While in the forced defrost mode if the heater does not turn on, you will need to check its continuity using its circuit wire terminals from inside the electronic control board which you will have to remove. Do the heater continuity test while the appliance is unplugged, but you will first need to make sure the temperature is below 46 degrees Fahrenheit. If while in the forced mode the heater melts the frost, it means it is working as it should, so what you need to check instead is the resistance of the thermistor.

Problem with the thermistor or the control board 

With the defrost heater circuit showing continuity, it means the problem lies with the electronic control board of the thermistor. A bad control board does not send an electrical signal through the defrost heater circuit. To check the resistance of the thermistor, you first need to remove the panel at the back of the freezer to access it. While measuring the resistance take note of the temperature and compare the reading to what you see on the tech sheet. If it’s off by 10% you will need to replace the defrost temperature sensor (thermistor). If the thermistor checks indicate no problem, then you will probably need to replace the control board.

Here Are Some Of The Areas We Service In Broward County:

Weston, Parkland, Sunrise, Plantation, North Lauderdale, Lauderhill, Hollywood, Davie, Coral Springs, Tamarac, Pompano Beach, Oakland Park, Margate, Lauderdale Lakes, Deerfield Beach, Dania, Orlando, Miramar, Fort Lauderdale, Coconut Creek, Pembroke Pines, Lighthouse Point, Hallandale, Cooper City


Troubleshoot & Fix Defrost System Problems In Refrigerators syndicated from Appliance Repair Fort Lauderdale

Friday, March 13, 2020

Refrigerator And Freezer Not Cold Enough

Refrigerators and freezers are some of the most useful appliances we can have in our homes today. If these appliances stop working, we can get greatly inconvenienced as far as food preservation is concerned. For a refrigerator and freezer not getting cold enough, it is one of the most common problems that homeowners experience with refrigeration appliances. So it is important to understand the various causes of problems or reasons why sometimes a refrigerator or freezer won’t get cold enough.

Damaged door gaskets

If the gasket on the door of the refrigerator or freezer suffers any damage that makes it not to seal properly when you close the door, then you’re going to have warm air getting inside refrigerator or freezer compartments and they won’t get cold enough. It is important to inspect the gaskets to make sure they are not torn or getting loose to a point of interfering with the door closing properly and leaking cold air. 

Build-up of dirt on condenser coils

The condenser coils are supposed to help the refrigerator to get rid of the warm temperatures absorbed from the food stored inside the refrigerator. If that builds up around the condenser coil, they cannot efficiently cool down the refrigerant. So that’s another reason you may have the problem of a refrigerator and freezer not cold enough. These condenser coils are located in the back or the underside of the refrigerator, so you should access them while the appliance is unplugged from the power source. The best way to clean the dirt off is to pass a vacuum cleaner over the coils.

Frost buildup on evaporator coils

Sometimes moisture inside the refrigerator or freezer can form ice or frost on the evaporator coils. If that happens, it interferes with heat transfer as the evaporator coils are supposed to absorb warm temperatures from stored food. The defrost system is supposed to start periodically and melt any buildup of ice or frost on evaporator coils. If that doesn’t happen, then the evaporator coils will not efficiently absorb warm temperatures and the refrigerator or freezer will not get cold enough. With the frost build-up, the evaporator fan will also not work properly. It will probably hit the frost with its blade and start making a lot of noise when it becomes unbalanced. The evaporator fan is supposed to blow cold air to flow through paths on the evaporator coils in the absence of frost build-up. The defrost system failure can be due to failure of its component parts, that is, the defrost heater or the defrost sensor. 

Faulty thermostat and incorrect temperature control 

Sometimes the freezer or refrigerator will not cool properly if the thermostat is faulty or is not set to the correct temperature. You can locate the thermostat under the freezer or the refrigerator depending on your brand or model of appliance. For the refrigerator, the correct temperature setting should be 40°F or lower, while for the freezer it should be set at 0°F.

While there are many possible reasons to explain the problem of any refrigerator or freezer not cooling properly, you will realize that some problems will require simple fixes while others must be solved by experienced appliance service professionals. So make sure to call an appliance repair technician if the problem making your refrigerator or freezer not to cool well is beyond your technical skills and abilities.

These Are The Areas That We Service In Broward County:

Weston, Sunrise, Plantation, Parkland, North Lauderdale, Miramar, Lauderhill, Hollywood, Fort Lauderdale, Davie, Coral Springs, Coconut Creek, Tamarac, Pompano Beach, Pembroke Pines, Oakland Park, Margate, Lighthouse Point, Lauderdale Lakes, Hallandale, Deerfield Beach, Dania, Cooper City, Orlando


Refrigerator And Freezer Not Cold Enough syndicated from Appliance Repair Fort Lauderdale

Sunday, December 1, 2019

How To Replace Your Washing Machine Belt?

Usually, the belt in your washing machine lies between the drum pulley and the motor. It is this part that allows the drum to go round during the washing process. Once in a while, if the drum ceases to turn as it is supposed to, it may indicate that the belt is worn out. Such indications may help you know whether you need to replace the washing machine belt or not. Sometimes, you might even notice the burning smell of rubber, which is usually an indication of a failing machine belt. If you also notice that once you start up the machine, the drum doesn’t rotate, then it means that you need to do some replacement. Once these issues start occurring, you will have to remove the old belt and replace it with another one. There are several places where you can buy the belt, be it in online stores or physical appliance stores. You, therefore, need to know how to put the washing machine belt in the right way, for the machine to resume its normal operations.

washing machine repair


Prepare The Machine

Before doing any other thing, you need to unplug the washing machine from the power supply. The washing machine uses electricity and trying to replace the belt when the power is still on is dangerous. You will notice that your washing machine needs to be laid on its side for you to access the belt assembly with ease. Laying the machine may be difficult if you are doing it alone. That is why you are advised to get someone to help you during this process. To avoid scratching the machine, ensure you put some old blankets or clothes on the floor before laying the machine.

Replace The Belt

Once you get the right belt for your machine, you need to proceed with the replacement. Your first task should be aligning the belt around the pulley. You want to ensure that the flat side doesn’t face inside.  See to it that the belt’s smooth side is facing out while the grooved side is facing inwards.  Arc the belt over the drum pulley to allow it to fit perfectly into the grooves. As you do this, see to it that the belt hangs flexibly onto the drum pulley. After this step, you want to secure the belt to the pulley with something like a zip tie. The zip tie is usually great because it allows you to stretch a tight belt. Proceed by pulling the end of the belt tightly until it stretches around the motor pulley and fits well into the groove. Slowly spin the drum in a clockwise manner to turn the pulley. The aim is to ensure that the belt aligns on the pulley. If it aligns, cut the zip tie because leaving in inside the machine may cause the belt to slip, which is dangerous.

It is good to know how to replace the belt of your washing machine if you own one. This knowledge is essential because your washing machine may break down once in a while. Use the knowledge above to replace your belt.

Broward County Areas That We Service:

Tamarac, Parkland, Margate, Davie, Plantation, Lauderhill, Cooper City, Lauderdale Lakes, Sunrise, Hallandale, Weston, North Lauderdale, Hollywood FL, Coral Springs, Miramar,Coconut Creek, Deerfield Beach, Lighthouse Point, Pembroke Pines, Pompano Beach, Oakland Park, Dania


How To Replace Your Washing Machine Belt? syndicated from Appliance Repair Fort Lauderdale